Addtime: 2020-07-08 Browse times: 3125
The complete dismantling of the rotary vane vacuum pump is called overhaul. For some vacuum pumps that have taken local dismantling measures and failed to eliminate the fault, the vacuum degree is still low and there are still leakage phenomena; or some pumps have one of the following phenomena; If the pump "stuck" phenomenon, the oil is very dirty and the pump has been scaled, rusted or inappropriate oil is used to harden the internal parts of the rotary vane vacuum pump (silicone oil enters the rotary vane vacuum pump This situation may occur inside the rotor), there is a large impact sound from the rotor, foreign objects (metal scraps, glass scraps, copper scraps, etc.) fall into the pump cavity and scratch the pump cavity. The temperature rise due to friction and heating is very strong (more than 70 ℃), etc., all need to disassemble the rotary vane vacuum pump for cleaning and vacuum pump maintenance.
1. Turn off the power and unplug the power plug. If the pump is on the system, it should be removed from the equipment.
2. Unscrew the oil bolt to drain the oil, and turn the pulley by hand to make all the residual oil in the pump cavity drain out. The oil should be collected. Generally, an iron oil pan or magnetic disk (commonly referred to as a square disk) is placed under the bottom of the rotary vane vacuum pump to collect it, so as to facilitate future distillation and recovery and avoid pollution of the environment.
3. Remove the belt, remove the pulleys and keys, and disengage the bottom plate. Depending on the quality of the motor (such as heat, dirt, dry grinding noise, large vibration, etc.), it should be repaired or repaired by an electrician.
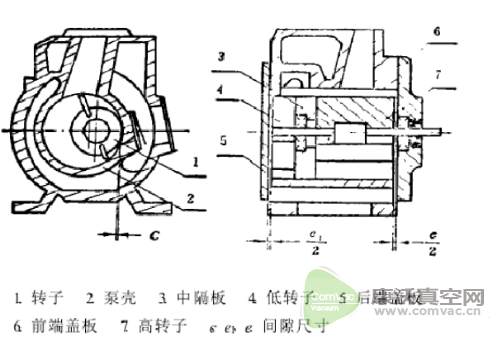
4. First remove the low-vacuum end cover (the rear end cover, that is, the end away from the pump wheel, see Figure 1), and use different tools according to different screws when removing. For general hex screws, open wrenches are available. For hex screws, hex wrenches are used, and socket wrenches are used when necessary, so that the screws will not be damaged. After unscrewing the end cover screws, gently open the end cover. If the end cover is tightly closed, you should slowly try to open it. For example, a file can be used to file a small groove at the joint of the pump cavity and the end cover plate. Then use a screwdriver (driver) to insert the small groove at the small groove and tap the handle of the screwdriver with a hand. You can also tap the screwdriver with a small hammer to exit the end cover plate. Never hit with a heavy hammer.

5. If the rubber gasket is used for sealing, remove the rubber gasket and exit the positioning pin.
6. Take out the rotor and rotor. Usually there are two tapped holes on the end surface of the low rotor. Screw the screw into this hole to easily pull out the low rotor. But pay attention to the pinch of the rotor when pulling out the rotor, because the rotor is subject to a large spring force, it is easy to take off the hand and fly out, accidentally falling on the ground or touching a hard object, breaking the corners and surface of the rotor, Cause unwarranted scrapping.
7. Disassemble the high vacuum end in the same way as 1, 2, and 3, and take out the high rotor and the rotor. At this time, the rotor can be taken out only by squeezing the rotor and the shaft by hand.
8. Before disassembling the pump, you should know the structural characteristics of the pump to be dismantled and what kind of structural type each part belongs to in advance. For example, for those parts that belong to the assembly, such as the rotor of some rotary vane pumps, do not disassemble, and the surface can be modified and adjusted appropriately; if glass chips and metal foreign objects fall into the rotor, the cavity is injured Or the rotary vane groove itself has been worn too much, and it can be disassembled when the accessories need to be replaced, but be careful to remember the assembly method.
9. Every time a component is removed, its accuracy, finish and damage must be checked. The stem angle of the rotor and the rotor should be paid special attention to check whether it is damaged, and make a record. For those who are not familiar with the vacuum pump repair business, they should gradually remember the original assembly position of each part and part, and make a record to prevent mistakes during reassembly. At the same time, the removed parts must not be placed randomly, piled up, bruised or lost. It is best to put it in a square disk, or put it in a wooden box and clean it, and cover it with silk cloth (if there is no silk cloth, at least it should be covered with glossy white paper).

Scan QR code and add wechat